

Benefits of PCS
(Probability of Compliance to the Specification)
The PCS service feature is a unique offering you will find only at Transcat. It is effective in normalizing all your calibration data to help equipment users determine when measurement risk situations exist. Simply put, if the PCS is 100%, you’re in the clear and need not worry about measurement risk. For measurement values where the PCS drops below 100%, measurement risk exists and the PCS value gives you a way to gage this risk.
How can PCS Benefit ME?
There are other benefits that come with the PCS feature. For instruments that are adjustable, the PCS can identify to the Cal lab that it is time to make an adjustment before an Out of Tolerance (OOT) condition crops up. OOT calibration results cost valuable time and money for your organization to process them. Having a mechanism in place to minimize OOT results saves your company the frustration and expense associated with this.
Example: Measurements of a Temperature Instrument from Calibration to Calibration
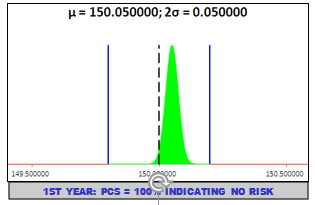
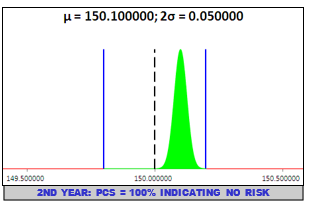
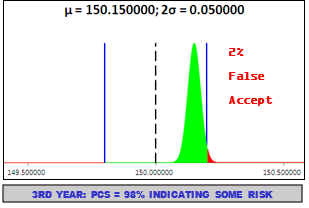
As an example, watch the measurements of a temperature instrument from calibration to calibration. The mean (Mu; µ) represents the instrument’s value in °C. The laboratory’s measurement uncertainty is represented as the 2 sigma (2σ) value of ±0.05°C. But you don’t really have to understand any of that when you purchase the PCS service level. The drift toward the upper limit indicates a trend in the instrument’s performance. As soon as measurement risk is detected, but prior to an OOT condition, the temperature instrument is adjusted to return its indications to nominal.



Why is an Instrument not Adjusted at every Calibration?
Not all results trends in only one direction; sometimes the values move around dependent upon many factors including daily usage and handling of the instrument, shipping effects, and for some instruments the way they are stored. Also, if you are plotting your instruments values in a control chart, adjusting instruments to nominal at every calibration will cause you to need to reset your base trend data and you will never be able to use a control chart. The purpose of the PCS service is to look for risk situations and mitigate them through guard band adjustment.
How can PCS help in the case of non-adjustable instruments?
We’ve shown PCS is great for adjustable instruments, but what about instruments that are not adjustable? Limit gages (Go and No-Go plugs/rings), threaded plug gages, gage blocks, some weights, angle blocks, and other fixed gages appear to pose a problem for PCS and guard band adjustments. A closer look reveals that the PCS can identify when these gages have reached their end of life prior to experiencing a costly OOT condition.
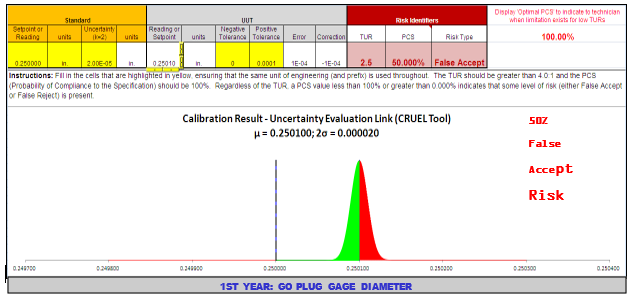

In the example below, a Go Plug Gage has just been purchased. Because Go plug gages are expected to fit into the part being tested (indicating a ‘Go’ or ‘Pass’ condition), they will wear over many applications. To maximize their use, they are manufactured to the large end of their unilateral tolerance; in this example, +0.0001 in./ -0.0000 in. For a nominal plug gage diameter of 0.2500 in., this makes the tolerance limits 0.2500 in. to 0.2501 in. as shown in the figure above. This is known as the ‘Start of Life’ for any limit gage, including cylindrical ring gages, threaded plug and ring gages, and others. By design, plug gages are manufactured to be acceptable at their upper end, even with the 50% PCS/False Accept risk shown. For No-Go gages, they are not expected to fit into the part and, as they find the occasional part that fails where the No-Go gage fits, they will also wear. Because this happens much less frequently,the No-Go gages will usually last much longer than their Go counterparts.
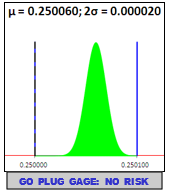

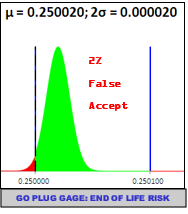

As these gages wear, the risk decreases for a time. In the figure to the left, the Go plug gage has worn to a point where the PCS is 100%. Finally, when these plug gages have worn far enough, they again enter a risk region near their lower tolerance limit. This is known as the ‘End of Life’ for the gage. Prior to the gage wearing to an OOT condition, the PCS will indicate when it is time to replace the limit gage, once again minimizing the time and cost elements of an OOT condition. You can learn more about PCS, measurement risk, and other Metrology concepts by viewing other white papers on our website.
Read our white paper on Guard Banding 101.
Download our white paper on What is PCS?.
Visit our Accreditation Resouce page.
