

Who's Making the Decisions About
Your Decision Rule
The clock reads 4:42 in the final moments of a playoff game between the New York Jets and the San Diego Chargers. The Jets seemed to come alive in the 4th quarter and have taken the lead at 17-7. The kicker for the Chargers, Nate Kaeding, is an AFC pro-bowler with an 87.2% success rate and a career long field goal kick of 57 yards. He has missed two field goal attempts up to this point in the game and he is about to attempt a third. It’s a 40-yarder, which should be a breeze considering his record. If you are a Chargers fan (my sister, Judy, is one), you know the sad outcome: wide right. However, the Chargers score a touchdown at 2:14 left in the game, bringing the score to 17-14. Unfortunately they were unable to make anything happen in the last minutes of the game; which brings us back to Kaeding. Had he made just one of those three field goals, the game would have gone into overtime, and then it could have been anybody’s game. Had he hit two of the three, the Chargers would have gone on to play the Colts and possibly would have moved on to the Superbowl. But, they didn’t. That was the end of the road for the 2009-2010 season. Sorry sis’!
On occasion, a field goal or extra point attempt hits the upright. When this happens, it is considered ‘no-good’. But in the world of calibration, if the instrument’s value is at either limit (i.e., ‘hits the upright’), it is considered to be ‘good’ or In Tolerance. How strange would it be to change the rules of the National Football League (NFL) and consider the upright as a successful field goal attempt? Not that it happens that often, but what if the NFL considered the upright and anything outside of the upright that is within the width of the football to be ‘good’? How would that change the statistics of the game? Probably not significantly, but on the occasion that a field goal attempt lies within this region the score would increase by 3 points. Not a fan of this concept? What about when this is applied to calibration? Would you consider allowing some wiggle room outside of the tolerance limits for your instrument to be called ‘good’, or would this be taboo for your quality system?
When you have an instrument or a gage calibrated you should receive a calibration certificate (and hopefully you’re getting calibration data and the lab’s measurement uncertainties[1] too). What do you do with the certificate if it indicates the instrument was In Tolerance? Do you just file it, or do you take the time to look over the data? If you don’t look at it, you might want to start because some calibration providers allow themselves this wiggle room and, unless you are completely aware of what your calibration service provider is doing, they may be making decisions on your behalf that don’t meet your quality requirements. Indeed, they may be making decisions that impact you without either one of you realizing it!
A Decision Rule, as related to calibration, is meant to clarify to all parties involved (within your organization and external to your organization) the component of your quality system that notifies you when an impact analysis needs to take place. The decision rule for a field goal or extra point in the NFL is that the ball must pass through the uprights and not pass outside of either upright in order to be awarded the point(s). What is your decision rule regarding when your instruments are called In Tolerance or Out Of Tolerance (OOT)? If this has not been defined in your quality policy and shared with your calibration suppliers, then you may be receiving a variety of calibration results that are not what you intended and could cause increased risk leading to poor quality in your processes.
You can gain better control of the quality of your processes and products by understanding the concept of a decision rule for calibration and then define and implement a decision rule within your organization. Sharing this outside of your organization with calibration vendors is important in order to get the results you expect. Upon receiving the calibration data for your instruments, crunch the numbers and see the factual results before deciding whether or not a product impact has occurred. After all, it’s your decision rule that determines when your instrument is ‘good’ vs. when it is ‘no good’, at which point you would be notified that the calibration data has potentially impacted your quality system. While the rules of the NFL are universally defined and accepted across the entire league, unfortunately for the international Metrology ‘league’, this is not so for many concepts (e.g., decision rules, test tolerances, classification of test instruments, or even recommended test points by class of instrument for that matter). Left open to interpretation, you’re allowing calibration providers to make changes to their reporting format without realizing that it is having an impact upon your quality system. That’s happening today – right now – and you’re probably not even aware of it. Bottom line: Don’t allow others to make decisions about your decision rule!
A Look Back...
The Renaissance Period (1450 – 1600) was a time of enlightenment and, literally translated, meant ‘new birth’. It was a change in culture brought about by the need to revolutionize the civilization of the Middle Ages which had been held captive by its traditions and often unjustified thinking about the world. It is important to understand that this period of change was built upon old concepts using new viewpoints and was not just an abandonment of everything that was known to that point in time.
Although this was a wide scale transformation defined over a recognized period of time, similar and smaller transformations over shorter periods of time can be seen throughout history. So what initiates these changes? And why do such transformations take so long to come about? Certainly, one can reason that it takes time for a person to collect a wealth of knowledge that allows them to arrive at a new concept. Some collect knowledge and use it in their daily life but never take the opportunity to piece that knowledge together to arrive at any new concepts. For those that do, once a new concept is conceived and then shared, it takes time to get the attention of others, some of whom will incubate the concept and others who will quickly dismiss it without further thought. For the few concepts that make it through this intellectual gauntlet, once a concept has been adopted, it slowly takes shape and becomes implemented in daily processes, at which point society can benefit from it. Moving along at this gradual and circumstantial pace, you can begin to comprehend why it has taken thousands of years for mankind to arrive at the understanding that we have today to develop the technology that exists at this point in time. We might have arrived at this point 100, 200, or even 500 years earlier if it were not for prior events that set us back (i.e., periods of war that held back or destroyed recorded knowledge, dictatorships that prohibited sharing of knowledge, etc.). On the other hand, acceleration of new concepts in the past hundred or so years was enabled through the publication of hundreds of thousands of white papers, articles, and books. Imagine what your world would be like today if we had kept up that pace over the past 2,000 to 3,000 years!
But have we completely broken free of intellectual bonds in today’s society? Certainly, there are still governments that control or prevent certain research activities, perhaps for the good of mankind, perhaps not. And there are politics (cultures, societies, or special interest groups) that stand in the way of scientific advancement and/or expression of art, literature, and religion. The point of this paper is not to attack these barriers of progress on a large scale, but to revolutionize your thinking and bring about some of the small scale transformations that still need to take place, specifically those related to Industrial and Legal Metrology. If you agree that we are still bound in some respects, then I welcome you to read further. If you do not agree, then I challenge you to read further and consider whether or not you, perhaps unintentionally, might be impeding the advancement of our culture.
In the Middle Ages, the period of time just prior to the Renaissance, trade was not free; it was not free from taxes and it most certainly was not free of scoundrels who cheated their customers. Most people have heard tales of unfair trade practices where some merchants used two sets of weights, a lighter set for selling their goods and a heavier set for buying, to gain an unfair advantage when trading with their customers. In that period, guilds were formed to protect local merchants from outsiders, to establish local trade laws, and to ensure customers were not cheated. They checked weights and measures and established levels of quality for goods within the local region of the guild. But that did not ensure that trade was standardized between guilds or that merchants outside of the guilds did not cheat their customers.
Since that time, we’ve collectively fixed the problem by having a worldwide traceability program in place within and between developed nations. Starting with the Treaty of the Metre on May 20, 1875 (World Metrology Day) and progressing through the advancements in measurement science, including the development of internationally recognized accreditation for measurement and testing, we have come a long way. Although the establishment of international measurement traceability has significantly curbed fraudulent or erroneous trade practices, it cannot ensure that unintentional practices occur with a resulting effect of cutting off the traceability chain. These unintentional practices can prevent good measurement from being propagated.
An example of unintentional practices by the consumer and the supplier is provided in the following case study to illustrate how easily the measurement traceability chain is broken and measurement risk is introduced. This infers that diligence in communication between the calibration client and calibration provider is an important part of ensuring that good measurement is propagated to the end product.
Case Study: Plain Ring Gage Calibration
A manufacturer of ring gages calibrates a 0.453 inch Go Gage to Class Z tolerances (+ 0 / - 0.000100 inch) upon request from their client. A statement on the certificate indicates that the calibration complies with ASME B89.1.6-2002 and that Accept/Reject decisions are based on Table 3 of that standard. The calibration certificate states “Received In Tolerance” and “Returned In Tolerance”. As often happens, the client does not look further at the measurements recorded on the certificate because the In Tolerance statement indicates that the ring gage met the client’s expectation for performance over its previous calibration cycle. However, there is an additional statement on the certificate that indicates the OEM has a policy of not rejecting a ring gage if that ring gage falls undersize by less than half of the measurement uncertainty. The stated measurement uncertainty is 12 micro inches (k=2). How do these statements impact the client’s quality system?
Here are the reported results of the calibration:


Let’s look at the readings in figure 1 individually to better understand the relationship of each of the statements described in the preceding paragraph.


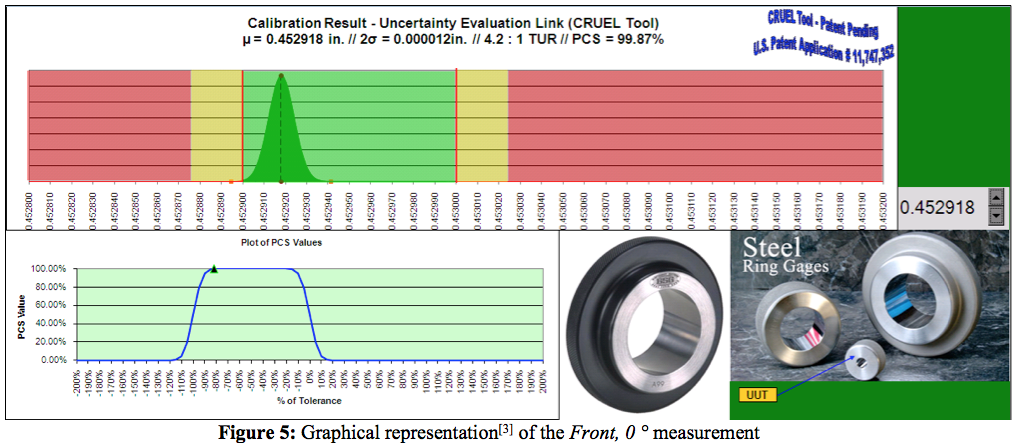
While the “As Found” reading is In Tolerance and the TUR is better than 4:1, there is a very slight risk (1 – 99.87% = 0.13%) that, due to changes over time in the values of the components that contribute to the total measurement uncertainty, a statement of In Tolerance could be incorrect, thereby causing the calibration laboratory to falsely accept the ring gage (for this measurement). As the quality manager of the company that owns this gage, or the manufacturing engineer, or the technician that uses this ring gage, can you live with that? What is your decision rule?
To put the PCS figure into perspective, let’s talk first about decision rules. The traditional decision rule states that the instrument’s reported calibration value is allowed to vary anywhere within the tolerance window, up to and including either tolerance limit. If you haven’t given any thought to the concept of a decision rule, then this is likely the practice you’ve been following without formally understanding that this is a decision rule regarding the compliance of your measuring instruments against their allowed tolerances. Graphically, it looks like this:
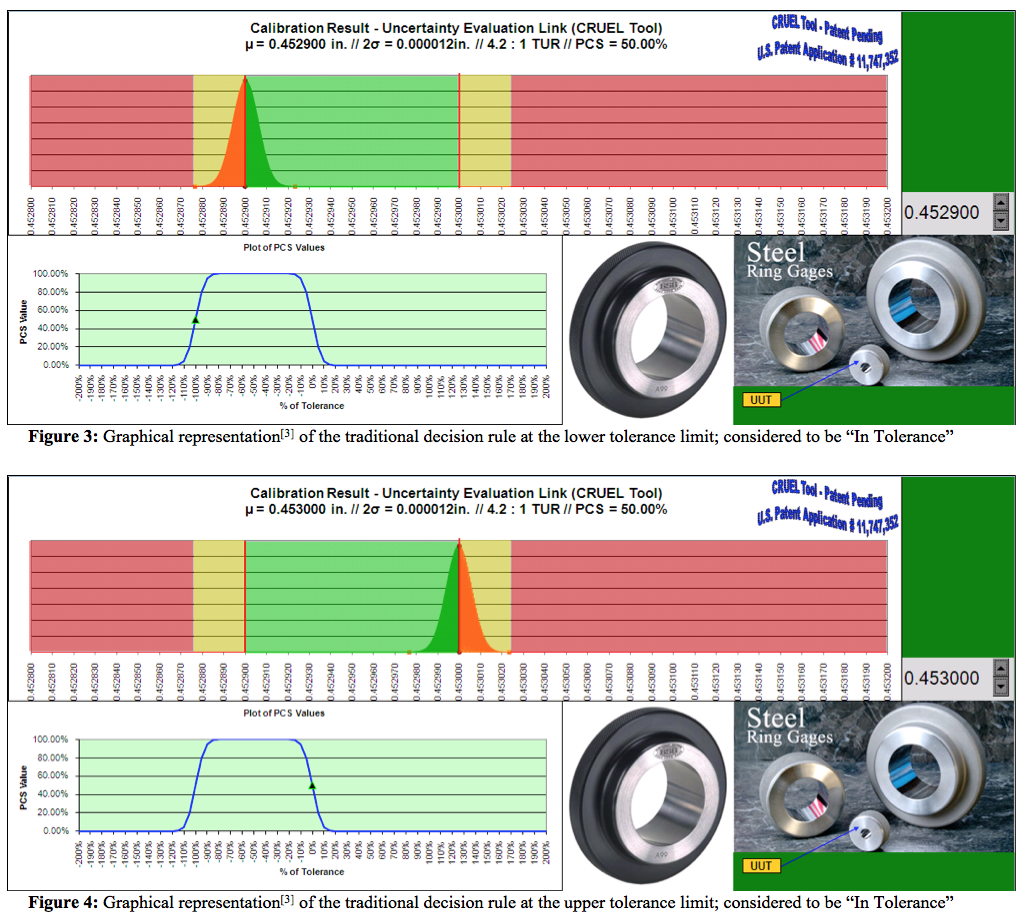

Notice that the PCS value is 50% at either tolerance limit. This means that there is a 50% chance that the “In Tolerance” statement is correct, and likewise a 50% chance that it is incorrect. So, with the traditional decision rule you can see that the odds of having a false accept risk increase (up to 50%) as the size of the gage approaches the tolerance limit from any point within the tolerance window.
Returning to the original question, can you live with a 0.13% chance that the “In Tolerance” statement is incorrect and the gage is actually “Out Of Tolerance”? Given that you’ve likely been living with up to a 50% False Accept risk, I’m guessing you’re fine with 0.13%. Traditionally speaking, that is.
With that understood, here is the graph for the data from figure 2:

The results of the subsequent readings and their graphs are shown in figures 6 – 15:
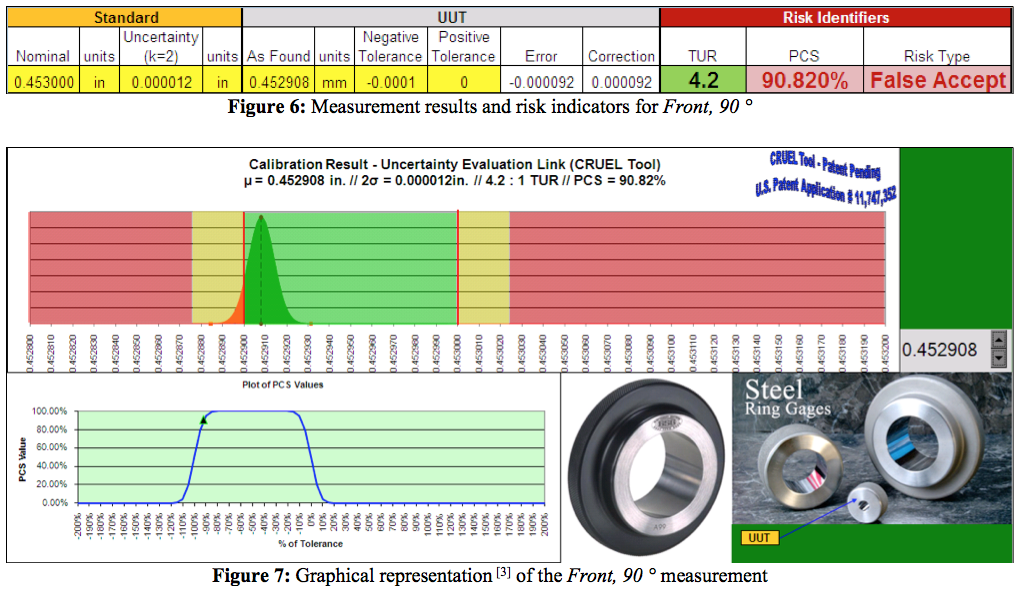

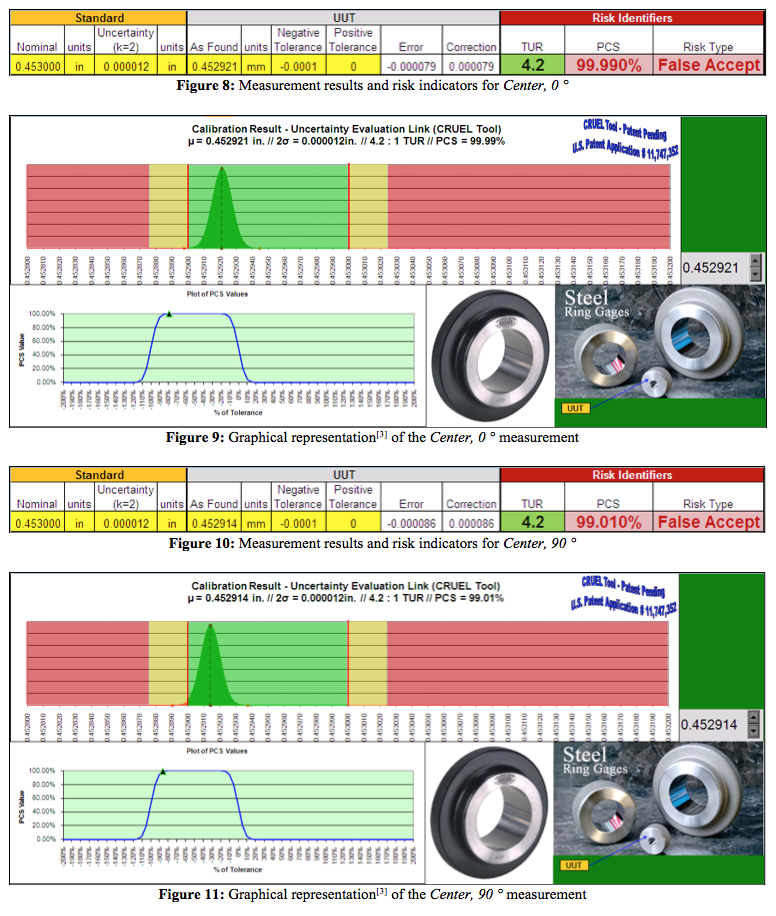

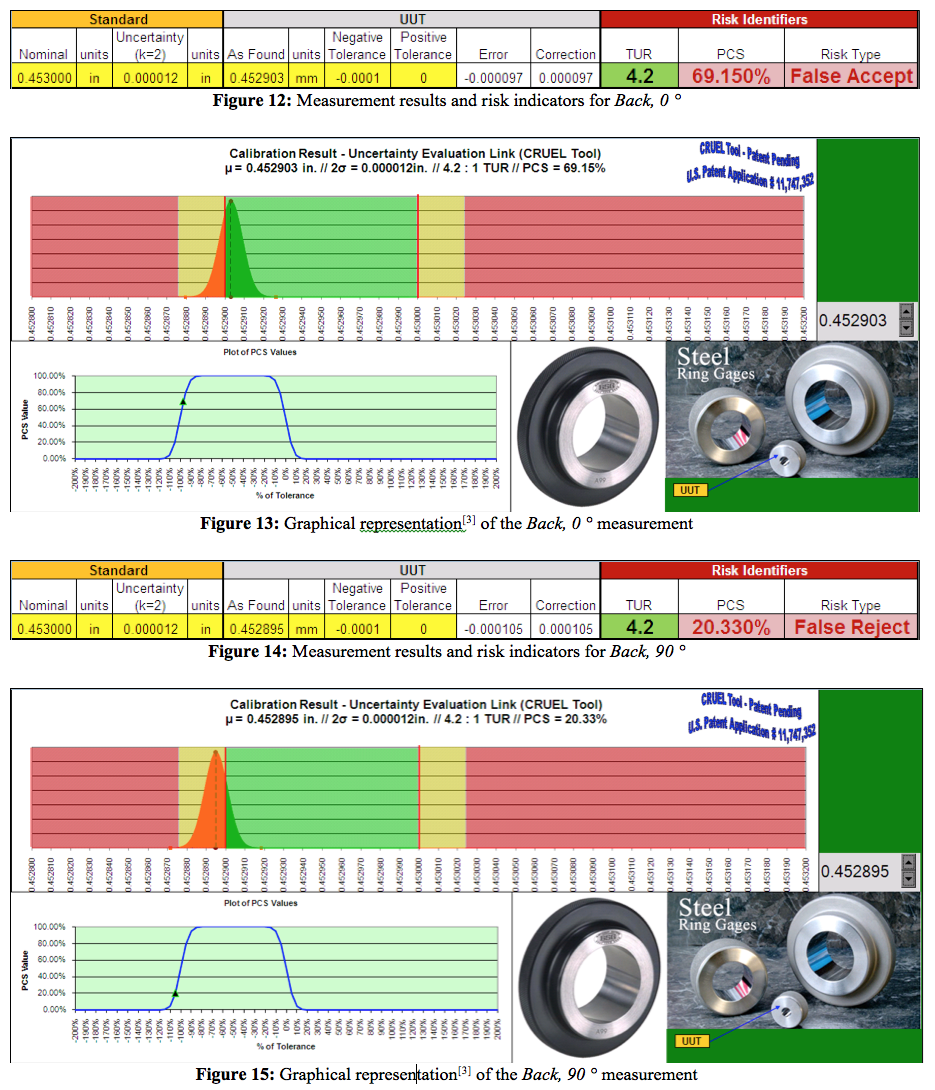

In figures 6 – 11, the chance of a False Accept situation is less than 10%. Figures 12 and 13 indicate a False Accept risk of just over 30%. From the traditional viewpoint, this has been acceptable. But should this be acceptable knowing what we know today about measurement uncertainty and a calculation like the PCS to indicate the risk for False Accept (or the methods for calculating False Accept under the Z540.3[4] handbook)? You may decide that you need to make your decision rule more conservative than it has been in the past. If you already have a conservative decision rule, some or all of the readings for this gage may be unacceptable. At the extreme, you might make a decision rule that is completely risk averse; that which only considers “In Tolerance” to include calibration results where there is no risk of False Accept. This type of decision rule is associated with a commonly known term: Guardband.
Traditionally, a Guardbanding practice ensures that the instrument is adjusted whenever the “As Found” value falls within the measurement uncertainty region surrounding either tolerance limit. Making a change to your quality policy to call this condition “Out Of Tolerance” is a change to your Decision Rule. Why would you do that? Well, you might want to perform an impact assessment whenever there is any amount of risk involved, particularly in a risk averse industry such as the medical device, food processing, biomedical, or pharmaceutical industries. It’s your Decision Rule; make sure you’ve established one that works for your company! Most calibration providers follow the traditional decision rule protocol. However, some do not.
That takes us to the last test point result (Back, 90 °) shown in figures 14 and 15. With this measurement result, there is nearly an 80% chance that a False Accept situation exists, yet in this case the calibration provider calls this condition “Received In Tolerance” and “Returned In Tolerance”. So regardless of your decision rule, this calibration result is given a passing condition because the calibration provider (the OEM in this case) has added half of their measurement uncertainty to the tolerance window. With a 20% chance of being correct, are you comfortable with their decision to change your decision rule? If you knew of this practice prior to the calibration, then hopefully you understood it, agreed with it, and approved it for your applications. If you weren’t aware of this practice and haven’t been paying attention to your calibration certificates, or if you only pay attention to the data when the statement of compliance indicates Out Of Tolerance, then let me introduce you to another white paper that, although it has some outdated content, contains some excellent concepts. It is a paper that was written by the late Phil Stein entitled Buyer Beware![5]
Some (not all) calibration providers, which include OEM’s that are typically exempt from supplier audits or ISO 17025 requirements because they are generally considered to be the expert, have extended the passing condition to allow the tolerance limit to expand by up to the full amount of their measurement uncertainty. Using the NFL analogy, the ‘field goal’ decision rule is sometimes being changed. It’s as if each referee can make the call as to which field goal decision rule they want to use for the games they arbitrate. Correlating the NFL analogy to this ring gage, this particular referee (cal provider) says the football (ring gage reading) can hit the upright (tolerance limit) or pass just outside of the upright by as much as half the width of the football (measurement uncertainty) to be considered ‘good’. A different referee may use the traditional NFL decision rule that says the football must pass between the uprights to be ‘good’; hitting the upright or anywhere outside of the upright is ‘no good’. Which ref and which decision rule are you using for your calibrations?
Summary
It is important to understand the concept of a Decision Rule and then to define, document, and implement this concept into your business processes. For those who had not previously been familiar with the term, likely the traditional decision rule has been followed in the organization. More importantly, many people may be unaware that some calibration services have implemented practices that negatively impact the traditional decision rule. While this may have been done unintentionally on their part, in the end it causes increased measurement risk – and that is never a good thing. To ensure that the traceability chain remains intact and that good measurement is preserved, we must all be cognizant of the impact our decisions have upon subsequent links in the chain.
References
1. Zion, Risk Management: The critical role of measurement and calibration, 2008 Transcat, Inc.
2. Zion, Metrology Concepts: k=3.9? . . . Why not??, 2006 NCSLI Conference Proceedings.
3. CRUEL Tool, U.S. Patent Application No. 11,747,352; Canadian Patent Application No. 2,631,083, Transcat, Inc.
4. ANSI/NCSL Z540.3-2006, Requirements for the Calibration of Measuring and Test Equipment, NCSL International
5. Stein, Buyer Beware!, American Society for Quality – Measurement Quality Division
About the Speaker
Howard Zion is the Director of Technical Operations for Transcat, Inc. He holds a B.S. in Engineering Technology and a M.S. in Industrial Engineering & Management Systems from the University of Central Florida.
Howard has collected a wealth of knowledge in many disciplines during the span of 27 years in Metrology, and has been employed with:
- The United States Air Force (Strategic Air Command - PMEL)
- Lockheed Martin (Electronics and Missile Systems – Calibration Labs)
- NASA-Kennedy Space Center (Standards & Calibration Laboratories)
- Philips Electronics (Broadband Networks – Metrology/Test Engineering Operations)
- Transcat, Inc. (Corporate Office)
Mr. Zion performs additional duties in various communities, serving in the following roles:
- Three NCSLI Working Groups (155.1, 163.1, & 164.1)
- Advisory board at the University of North Carolina at Charlotte (UNCC)
- Sponsor for Engineering Capstone projects at the Rochester Institute of Technology (RIT)
- Author of white papers on measurement uncertainty and business processes related to Metrology
You may contact Howard at hzion@transcat.com
Read our white paper on Guard Banding 101.
Download our white paper on What is PCS?.
Visit our Accreditation Resouce page.
